Exciting news! The German Make magazine has spotlighted our ePulse Feather C6 development board in its latest issue. Join us as we explore this recognition and what it means for the maker community.
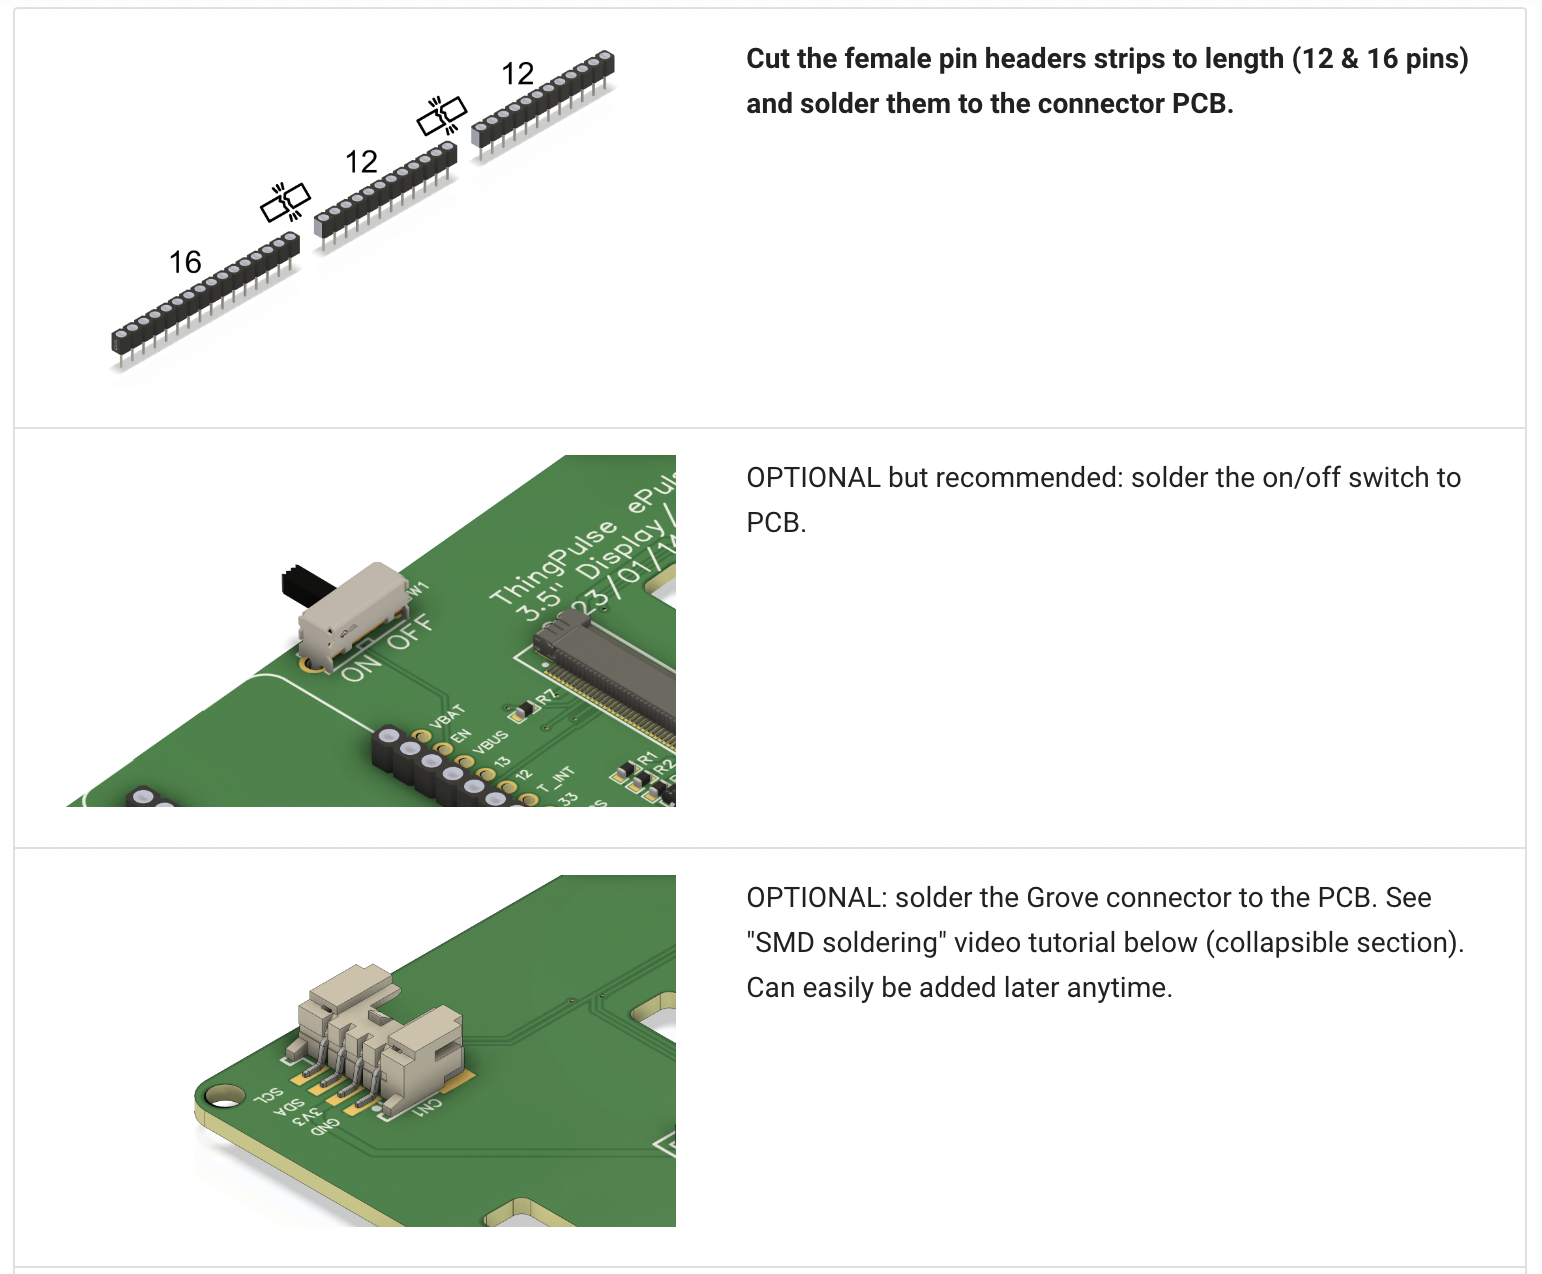
Since we launched the ESP32 Color Kit Grande Starter Kit in 2023 it has been a big success. Now we have taken the time to add illustrations to the step-by-step guide to make it even easier for you to assemble.
The ESP32 family of chips never ceases to impress; with just a few lines of code, you can turn an ESP32-S3 board into a WiFi dongle, connecting a host computer to WiFi via USB. Or you can run a script to infiltrate a target computer. Additionally, you can turn it into a memory stick with a WiFi interface.
Displaying your Microsoft Teams presence on Icon64, the ThingPulse LED matrix device, is a great way to let others around you know whether you are available or whether they would be interrupting your meeting.
We are pleased to announce a brand-new app for the Icon64 that allows you to broadcast your Microsoft Teams presence to
Just like Zoom an others, Microsoft 365 family member “Teams” offers a traffic-light style presence to announce your availability . You are either available, busy, away or offline (for real or fake). There are over a dozen different detail states but the traffic-light is usually what counts. Our Icon64 app does exactly this: mapping your presence to the three colors green, yellow, and red.
For once, we did not have to start from scratch when we set out to implement a new app for the Icon64. Instead, we forked the ESPTeamsPresence project by German maker Tobias Blum. While he 3D-printed the case for the electronics, we already had a device. Hence, we only needed to port the software. Thanks to ESPTeamsPresence’s modern foundation – Tobias used PlatformIO – and well-structured code, porting it to the Icon64 was fairly simple. However, while Tobias mapped the Microsoft Teams presence to eleven different color & animation combinations, we opted for sticking to the traffic-light. We felt that your family or co-workers should not have to remember all those eleven combinations to understand how available you are.
A note on security
Your Teams presence is not publicly available, it shouldn’t be. You need to grant the Icon64 presence app permission to access this information. You do so in a simple guided workflow in the browser. It is all described in our documentation. As you will most likely do this in the context of an organization that grants you access to Teams such as your employer or your school, they might want to have a say in this as well.
On the Microsoft side the device is represented by an Azure “application”. It is not an application in a traditional sense (source code and stuff) but a security element for consent management. The application manages the data privileges your device has. It needs access your profile and presence data – and nothing else. You can either use the multi-tenant application Tobias Blum set up, which is the default, or register your own application. Which ever way it is, your organization might have to whitelist that application. The authorization workflow cannot be completed otherwise.
Place the Icon64 next to your home-office door to communicate to your partner or family whether you are available.
The ESP32-S3 is endowed with two noteworthy USB features that its predecessor, the original ESP32, lacked: USB OTG and USB CDC/JTAG. This blog post delves into the platformio.ini settings that govern the USB behavior of the ESP32-S3, with a particular focus on logging in CDC/JTAG mode.
In an earlier blog post we described how to use the ePulse dev board to send messages over ESPNow to achieve ultra long battery life. Now we wanted to test our new development board – the ePulse Feather – with a similar setup.
When was the last time you were thinking about your breathing pattern or the algorithm that forms it (or does the pattern form the algorithm)? I guess it is safe to assume that if your answer is “never” or “it’s been ages” you will be like most readers. Also, if the term spirometry does not ring a bell with you: relax, welcome to the club. Spirometry is the measuring of breath by the way.
In an earlier blog post, we presented tricks to increase the battery life of your typical ESP8266 or ESP32 application. In this blog post, we show you how to prolong your device’s battery life from 7 months to 44(!) months.
The SDC4x offers an unmatched price-to-performance ratio despite coming from a country with very high living and production costs. Furthermore, it more than breaks the size barrier in CO2 sensing. A CO2 sensor of such precision and accuracy in a <1cm3 package is unheard of.
We built the Icon64 with extensibility in mind from the very beginning. This allows us to react quickly to specific customer requirements. The Swiss C02-monitor is a result of this.
The Icon64 CO2-monitor is perfect for your classroom, living room, and (home-)office.
A student asked me yesterday: how did we manage to survive so far without?
Primary school teacher after introducing the Swiss CO2-monitor
With 27 students it takes about 15min until it blinks red. Opening the windows for five minutes brings the level down to 500ppm and everybody continues to work with peace of mind.