


Description
The ESP WiFi Color Display Kit contains all the components you need to build the WeatherStation Color and the PlaneSpotter Color project:
- 1x Wemos D1 Mini (4MB Flash)
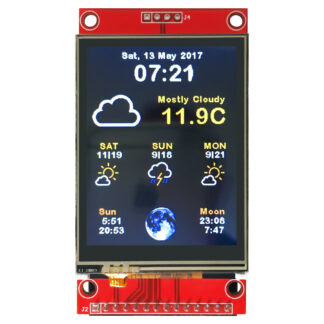
- 1x 2.4″ ILI9341 Color Display TFT with Touch Interface (320×200 Pixels)
- 1x Custom Connector PCB to connect the ESP8266 and the TFT
- 1x Set of Pin Headers
- 1x USB Data Cable
Please note: soldering is required with this kit
A step-by-step tutorial/guide is available on our own documentation platform.
Color Kit Projects
Here are some of the awesome projects you can build with the Color Kit hardware:
ESP8266 Spotify Remote
With this project you can remote control your currently active Spotify player (smartphone, web player, dedicated device, etc) with an ESP8266! After the initial authentication and authorization with the Spotify API the device downloads the artwork from the currently playing song and displays the title and the artist’s name. Since the Color Kit comes with a touch screen you can also pause the song, continue to play and jump to the next and previous song. And if that is not enough you can extend our code control volume or other features offered by the Spotify API. In the demo video below you see the Color Kit on the left and for reference an iPhone 5 on the right. The music is played by the iPhone, not the Color Kit.
Project repository and instructions: https://github.com/ThingPulse/esp8266-spotify-remote
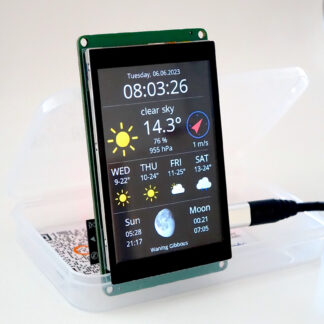
ESP8266 WeatherStation Color
Color Kit Cases
Do you need a case for the WeatherStation Color that is easy & quick to build yourself? Just print out our template, glue it on some card board (e.g. pizza box), cut it out and you’re done in less than 20 minutes!
If you are into 3D-printing you will find at least three designs on Thingiverse that customers uploaded:
Karl Rohner –
Habe das Video von Hobbyelektroniker gesehen und finde die Idee sehr gut.
Leider stehe ich mit Paypal auf Kriegsfuss. Gibt es eine andere Möglichkeit Kaffees zu spenden? Gruss Karl
Pim –
Nice design, nice kit, well packed and speedy shipment. Putting it together is 5 minutes work. Sfwr is up and running. Next is adapting it to my wishes 🙂
AdaBill –
I have 4 of the OLED weather stations from SQUIX and as looking forward to this new TFT color version. I had downloaded his software only and had problems finding the TFT board he was using, so when I saw this complete kit, I ordered it. The parts were all there and i started assembling it. I didn’t like the idea of “CUTTING OFF” the sd chip holder so I didn’t to solder it up yet. I wanted to see if there was a 3D case for the unit and make sure it would fit the new configuration. all the other projects had a blog where others would comment about and problems and fixes. i didn’t see one for this color weather station. I also didn’t see and reference to a 3D case! I downloaded the SW from github and installed all the libraries. I’m using 1.8.2 IDE. The code compiled OK and when I went to upload it to the WEMOS, I started getting errors :
ets Jan 8 2013,rst cause:2, boot mode:(3,6)
load 0x4010f000, len 1384, room 16
tail 8
chksum 0x2d
csum 0x2d
v00000000
~ld
Exception (3):
epc1=0x40213bf4 epc2=0x00000000 epc3=0x00000000 excvaddr=0x40247139 depc=0x00000000
ctx: cont
sp: 3fff18e0 end: 3fff1b80 offset: 01a0
>>>stack>>>
3fff1a80: 3fff07ac feefeffe feefeffe feefeffe
3fff1a90: feefeffe feefeffe feefeffe feefeffe
3fff1aa0: 3fff1b16 3fff1b14 3fff0624 3ffe8c29
3fff1ab0: 3fff1ac2 3fff1ac0 3fff0624 40207197
3fff1ac0: ffffffff 00f00140 00000001 4020782e
3fff1ad0: 40200000 00000000 3fff0624 000000f0
3fff1ae0: 00012c00 00000000 3fff0624 000000a0
3fff1af0: 3ffe8c28 00000078 3fff0618 40206aaa
3fff1b00: 3fff1b12 3fff1b10 402120e0 3fff0b60
3fff1b10: 00000000 00000000 00000078 3fff0b50
3fff1b20: 3fffdad0 00000000 3fff0624 3fff0b50
3fff1b30: 3fffdad0 00000000 3fff0618 40208d16
3fff1b40: feefeffe feefeffe feefeffe feefeffe
3fff1b50: feefeffe feefeffe feefeffe feefeffe
3fff1b60: feefeffe feefeffe 3fff0b48 40212124
3fff1b70: feefeffe feefeffe 3fff0b60 4010070c
<<<stack<<<
I'm stuck and need some help to proceed.
MikeG –
Excellent composition of Hardware, Software and Geniousity 🙂
Complete kit provides out-of-the-box happiness in completing the kit – great deal !
A pleasure to support your work by buying your stuff to enable you creating to create other miracles…
Bill Miller –
I think it was my fat fingering that caused the problem. I went back and downloaded the latest version of the Arduino IDE, (1.8.3) Reloaded all the libraries and this time it worked without problems. Looks great. All I need now is a good looking project box to show it off in.
Great job.
Jerry P. –
Very nice kit and easy to build. Daniel is a nice person to deal with especially if you have setup questions (which I did). I look forward to enhancements and improvements. Thanks very much.
Peter –
Hi. Great work!
Just note, “WeatherStationDemoExtendedDST” example code needs two Tickers, otherwise “setReadyForWeatherUpdate” will newer execute :
…..
Ticker ticker1;
Ticker ticker2;
…
ticker1.attach(UPDATE_INTERVAL_SECS, setReadyForWeatherUpdate);
ticker2.attach(60, setReadyForDHTUpdate);
HC Walker –
Kit arrived in neat box, well packed, good impression, very professional!
Followed the clear and easy instructions in the manual.
I appreciate all the extra information in the manual.
Contact Daniel on email, got a quick and friendly reply. Very nice person to deal with.
Kit is of great quality, all working first time.
I even ordered 2 more kits for friends.
Thank you Daniel, really appreciate all your effort and time to produce a GREAT kit.
Keep up the good work
Neil Harrison –
A very nice kit, easy to put together and well supported. Daniel helped me out with a problem that came up shortly after I built the kit and very quickly solved it for me. Excellent assistance from a friendly and helpful guy. Highly recommended.
Christopher Rust –
This was a great kit. I followed the instructions and I was able to get it to work with only a minor issue. If it helps someone else the Wemos ESP8266 in my kit required the Silicon Labs CP210x driver (http://www.silabs.com/products/development-tools/software/usb-to-uart-bridge-vcp-drivers). The troubleshooting section mentions this but I just thought I would comment here incase someone was having an issue. Other than that everything worked right away. I just took my time, installed the Arduino IDE, added the ESP8266 boards manager, installed the libraries mentioned (Mini Grafx, ESP8266 Weatherstation, JSON Streaming Parser, SimpleDSTadjust), edited the Settings.H file for my location, set the clock mode to 12 hour AM/PM, changed the metric system to imperial, modified the time zones for the central time zone in the USA, set the WIFI information, and created a Weather Underground API. Everything is working great! Thanks…
jay.ham –
Great Kit, I made a simple 3d-printed desktop stand https://www.thingiverse.com/thing:2471803
suculent –
Built my weather station in less than 60 minutes. Awesome UX, works like a charm.
# Hardware
Nice packaging comes with more than you need to build your weather station. I’ve chose not to remove the SD card slot and attach the enclosed Wemos D1 Mini Pro using a connector instead of soldering directly. It will allow for future replacements and adding another shield, where I want to plant some basic temperature/humidity sensor (possibly remotely connected). The board does not leave much pins free, however more devices can be easily chained through I2C bus.
What you’ll build in less that 20 minutes of soldering is a device, that (with demo sketch for Arduino IDE) is able to connect to your WiFi and fetch current WeatherStation data for pre-defined location. On first start, it will require to calibrate touch display used to control the device.
Which gives a real brainkick when you realize you have SD card, touch screen, free serial port and you could easily add GSM module (without additional memory requirements) and possibly some additional I2C device(s) attached.
### Software
Even though it might not be visible at first sight, there’s a tremendous amount of work behind.
The awesome Arduino sketch with LCD, WiFi, WeatcherStation and NNTP support has only 438k built so there’s still plenty of room to add more features.
suculent –
I have build this weather station in less than 60 minutes (soldering, programming using Arduino IDE). Awesome UX, works like a charm.
# Hardware
Nice packaging comes with more tham you need to build your weather station. Only thing that was missing was a piece of paper with reference to documentation, which is to be found on the Internets.
I’ve chose not to remove the SD card slot and attach the enclosed Wemos D1 Mini Pro using a connector instead of soldering directly. It will allow for future replacements and adding another shield, where I want to plant some basic temperature/humidity sensor (possibly remotely connected). The board does not leave much pins free, however more devices can be easily chained through I2C bus.
What you’ll build in less that 20 minutes of soldering is a device, that (with demo sketch for Arduino IDE) is able to connect to your WiFi and fetch current WeatherStation data for pre-defined location. On first start, it will require to calibrate touch display used to control the device.
Which gives a real brainkick when you realize you have SD card, touch screen, free serial port and you could easily add GSM module (without additional memory requirements) and possibly some additional I2C device(s) attached.
However, the packaging would use a business card with URL to continue from with software installation.
# Software
Even though it might not be visible at first sight, there’s a tremendous amount of work behind this thing (and by ‘thing’ is meant a combination of software and hardware). When you start installing the sample Weather Station sketch, it appears that you need to install some libraries, all of them by Daniel Eichhorn: ESP8266 WeatherStation which is a WeatherUnderground client, Json Streaming Parser that helps keeping low memory profile while getting huge API responses, and Mini Grafx library that implements a VSYNC equivalent through framebuffer for embedded devices.
The Arduino sketch has 438k built so there’s still plenty of room to add more features. However, I’m looking to dive deeply into existing example code in order to reuse as much as possible. There’s NNTP, visual WiFi display, display carousel, icons, fonts, colours and last but not least the touch screen support.
Erich Styger –
I’m very happy with that kit. See https://mcuoneclipse.com/2017/09/10/wifi-tft-touch-lcd-weather-station-with-esp8266/ for details.
Jara Cimrman –
ESP8266 WiFi Color Display Connector by blog.squix.org
Build your weather station in less than 60 minutes. Awesome UX, works like a charm.
### Hardware
Nice packaging comes with more tham you need to build your weather station. I’ve chose not to remove the SD card slot and attach the enclosed Wemos D1 Mini Pro using a connector instead of soldering directly. It will allow for future replacements and adding another shield, where I want to plant some basic temperature/humidity sensor (possibly remotely connected). The board does not leave much pins free, however more devices can be easily chained through I2C bus.
What you’ll build in less that 20 minutes of soldering is a device, that (with demo sketch for Arduino IDE) is able to connect to your WiFi and fetch current WeatherStation data for pre-defined location. On first start, it will require to calibrate touch display used to control the device.
Which gives a real brainkick when you realize you have SD card, touch screen, free serial port and you could easily add GSM module (without additional memory requirements) and possibly some additional I2C device(s) attached.
However, the packaging would use a business card with URL to continue from with software installation.
### Software
Even though it might not be visible at first sight, there’s a tremendous amount of work behind this thing (and by ‘thing’ is meant a combination of software and hardware). When you start installing the sample Weather Station sketch, it appears that you need to install some libraries, all of them by Daniel Eichhorn: ESP8266 WeatherStation which is a WeatherUnderground client, Json Streaming Parser that helps keeping low memory profile while getting huge API responses, and Mini Grafx library that implements a VSYNC equivalent through framebuffer for embedded devices.
The Arduino sketch has 438k built so there’s still plenty of room to add more features. However, I’m looking to dive deeply into existing example code in order to reuse as much as possible. There’s NNTP, visual WiFi display, display carousel, icons, fonts, colours and last but not least the touch screen.
Rick –
Another nice piece of work…nice job… thanks again…
John Czaia –
Very good quality set, even the excellent box it comes in can be used to hold my assorted other electronic modules.
Had some initial issues getting it to work, but was 100% my fault as I did not realize for a few embarrassing minutes that I did not use the proper WeatherStation COLOR Arduino script while following the how-to for an older WeatherStation, facepalming ensued, worked fine after. 🙂
Impressed with the touchscreen working so well.
But, very well done, good price – would buy again.
Now to print a 3D case. Anyone got some ready-made STL files, pretty please?
Filip Mulier –
Here is a ready made case for this project: https://www.thingiverse.com/thing:2603094
Fredrik Sundqvist (verified owner) –
Excellent kit. It really contains everything you need. And the documentation is very good.
Jacob Heykoop –
ESP8266 WiFi Color Display Connector by blog.squix.org
Quick Delivery to Canada relative to my other vendor orders from China. Nicely packaged and complete. Very happy with the touch screen quality, Next up for me is to customize the presentation with some local sensor data and a case.
Thank you Daniel for sharing your hard work!
Giuliano Peritore –
Really nice package, kit with needed accessories, easy soldering, beautiful.
Touch screen is responsive and nice to see.
Thanks to Daniel !
Lee –
A very nice kit to make, well presented and arrived fast.
I do have a question though, i was hoping to run this from a power bank, through the micro usb, in a picture frame but it uses the battery in a day. is there a better way to do this? would a 3.3v battery connected direct to the esp8266 last longer? i did read about using the sleep mode of the esp8266 but being very very very new to this i didn’t want to do something that would break it.
Cheers.
Barnaby Astles –
Great kit Easy to assemble and it works well using PlatformIO for the code.
Heiko (verified owner) –
Today I got my kit. It was easy to assemble, a little bit of soldering. The documentation is great: follow it step by step and for me it took about 2h to finish it. Quite a bit of the time was spent compiling the project as my laptop is pretty old.
The display is nice and crisp, the module looks sleek. Pressing the touch screen gives you different view and more information, e.g. wind speed and direction. I always wanted to have such a weather station and not have to open the iphone for such information.
The only thing I found a little lacking is the length of the USB cable: it is very short. So I bought a longer one.
Love that thingie!
Rob (verified owner) –
Really nice kit. No problem to get everything working quickly. Well packed too.
Changed the language as well in the code, which is fairly easy to do.
And I agree wth Heiko, the USB cable is short.
Thierry –
Very nice kit, works very well, easy to solder.
As I have several Wemos D1 mini pro boards, I wanted to use the screen for others ideas and others languages like micropython.
Is there somewhere a schematics to understand the pin mapping between the Wemos and the screen?
Marcel Stör –
Thanks for the kind words, glad you like it. I guess https://github.com/ThingPulse/esp8266-weather-station-color#wiring is what you’re looking for.
Brice –
@Thierry: Were you able to make it work with micropython?
Thomas –
Very nice project, well-documented!
Nick –
In case anyone still needs a printed case for this kit, I remixed the one that was already posted on Thingiverse to be a bit smaller, easier to print, with less material and an optional stand instead of the integrated one.
https://www.thingiverse.com/thing:3088616
Mike (verified owner) –
This a fantastic kit. It went together really well and worked out of the gate once programmed. I can’t wait to fiddle around with it (and get a case). Real effort was put into everything from the packaging to the “final product”. Thank you!
Brian Rosen –
This is really an outstanding product, even for fairly experienced people. I got it working in about 30 minutes not counting issues associated with my development environment. I received excellent support for something stupid I did with compiling the code. It looks good. It works well. It’s a great basis for building a UI for some other project I’m working on. Highly recommended. I was able to work with the code and move it up to current library versions without a whole lot of fuss. The code is well written, and easy to work with. Not a whole lot of comments, but it’s pretty clear how the pieces work together. It’s all open source, and I’m confident I can build from what is here meet my UI needs.